
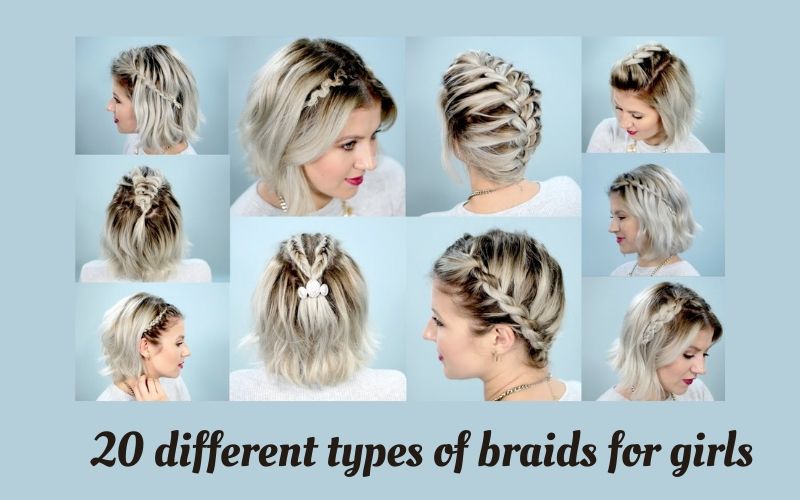
Braiding hair is an original and widespread way to pick it up and still look beautiful. There are infinite types of braids to choose from, yet they are all based on the same principle of braiding the hair starting from the selection of various strands, and each braid differs from the others according to their position. Beyond the standard braid, there are others that can be sported on special occasions, such as a wedding or a party, and some of these alternative styles will be the main topic of this article. In this article, you can know about 20 Different Types of Braids for Girls & how to make this.
20 Different Types of Braids for Girls
Bow Braid


The bow-shaped braid is very simple but highly effective, and it will seem that your hair is tied by a real bow. It is only achievable if you have long hair.
pigtails Braid

A hairstyle made with many braids gives a fun and youthful look and also allows you to show off your favorite bows or ribbons. It can be suitable for both medium length and long hair.
Trash braid
This type of braid is not as known or used as the other more common types of hairstyles, probably because it is a little more difficult to make; however, overall, the end result is true impact. So, you will only be able to do it if you have long hair and need help.
Crown braids
This braid style is very suitable for curly and voluminous hair. It manages to tame the hair on the skull and around the forehead, letting the rest of your hair frame your face in all its splendor. This type of hairstyle is good for medium curly hair; if you have longer hair, prolonging it excessively, it could give your face a too framed appearance, but sometimes it can still be pleasant.
High 70s braid
This type of braid is a very fine hairstyle and was popular in the 70s. The effect is better if you have shorter tufts (bangs) and some lateral sections of the longer hair; it is obviously a more suitable hairstyle for long hair.
Braid headband for short hair
This type of hairstyle is a trick and requires the use of artificial hair that is similar to your natural hair. It is really fun and can be used for a special occasion by adding artificial beads or gems.
Four strand braid

In the event that you simply cannot help suspecting that three strands during a plait are insufficient, at that time, you’ll presumably be enchanted to get that there are twists of 4 or maybe five strands. So on find out the way to appropriately weave such interlace, without transforming it into a tangled something, we propose that you simply watch video instructional exercises during which they unmistakably show how and with which strand to show.
French braid
This type of braid is truly a classic; you can wear it in two different ways: narrow and tidy or unkempt for a boho-chic look.
Dutch braid
This braid is similar to the French one but much narrower and … double! The level of difficulty rises a little, but it’s really worth it!
Herringbone braid

Although it looks like a difficult hairstyle to make, it is not at all! You will be amazed how simple it is to recreate the herringbone braid with your hair, and by taking your hand, you will succeed in doing so even with your eyes closed!
Dino braid
This braid is certainly inspired by the French one but has a decidedly higher hairline. So, the advice is to embellish it with flowers, ribbons, and hair piercings: the result will be amazing!
Crown braid
This hairstyle is chic, romantic, and simple to make! It will make you feel like Queens, even during the days when you don’t want to wear make-up or dress.
Milk braid
True, the name is not so inviting, but the Milkmaid braid – from English – is actually a very elegant and versatile braid; you can accompany it to any outfit.
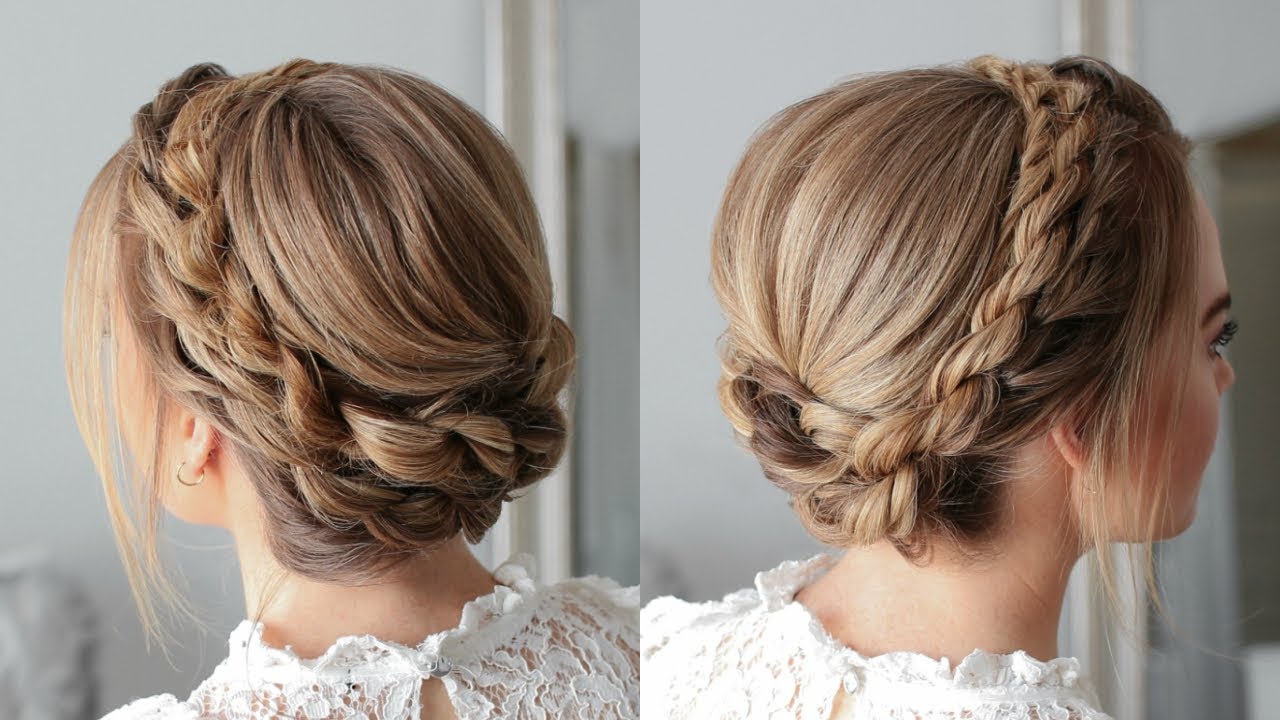
Halo braid

Here too, we speak of a braid collected—an attempt to make at least once in a lifetime. So, the procedure is similar to that for the Milkmaid Braid and the crown braid; if you are practical enough now, you just have to try!
Pipe Braid
This is a beautiful and moderately difficult braid to make, but it will be enough to dedicate some time to it, and the result will be perfect. Elegant and to be combined with your social evenings, the Pipe Braid will never make you go back.
Zipper Braid
Firstly, this is one of the most difficult braids to make, and you will need a lot of patience and practice. But the result is to be left speechless.
Moana braid
If there is a punk soul within you that always needs to emerge, this is the braid for you! It looks like a crest and gives it a truly unique look!
Cascade braid
The cascade braid is the right compromise if you love loose hair, but don’t want to give up an extra touch of class. So, this hairstyle is very easy to make and will be your faithful ally for special occasions! What are the Best Low Maintenance Haircuts?
How to make the first five braids
Bow Braid

1. Wash your hair. This type of hairstyle is best on very smooth and shiny hair. Use a hair straightener to straighten it completely before proceeding.
- The smoother these are, the more elegant your hairstyle will look, and it will be more suitable for a wedding or any other special occasion.
2. Divide your hair, starting from the center. Take a small lock sideways about halfway down the head. Comb it and then divide it into three sections.
3. Make a braid with the lock you have selected and secure it with a small elastic band.
4.Repeat the same thing on the diametrically opposite side of the head and secure with another elastic.
5. Make the bow. You will have two braids, and behind the hair still loose. Take the two braids and tie them together, giving them the shape of a bow in the back of the head. If possible, have someone help you to make it easier.
- Make sure that the loops of the bow are large and uniform on both sides; try to create a symmetrical bow.
- Secure the central part of the bow with bobby pins.
- Secure any other part of the bow that seems unstable to you, always using bobby pins.
6. Finish by tying the tail of the bow. Twist the two tails together, then wrap them to tie them together with a ribbon. So legal with this at the bottom of the bow.
Pigtails
1. Divide your hair, starting from the center. Add some gel or wax to smooth them.
2. Take a small section of hair and bring it sideways to the face. Divide it into three equal parts. Weave the strands obtained, starting to superimpose the right one on the central one, then the left one always on the central one, again the right one on the central one, and so on, until the end of the hair. Secure the braid with a pigtail.
- When making pigtails, always try to pull them slightly towards your face.
3. Repeat also on the other side of the face.
4. Divide the back of the hair into four equal sections. Divide each section further into three strands, starting at the top of the head. So, as you braid, grab sections of hair sideways (use your fingers to grab more hair). Secure the ends with elastic hair ties.
5. Add accessories. Use hair bows or decorated clips at the end of each braid.
Trash braid

1. Wash your hair. This hairstyle is best when the hair is very smooth and shiny. Use a straightener on all the strands to make the hair as smooth as possible.
- Divide your hair into several strands of the same thickness.
2. Start on the right side. Overlap the first strand (the one closest to your face), on the second that is next to it.
3. Overlap the third lock on the second one just obtained. Don’t pull too hard, as this is a hairstyle that goes down soft.
4. Repeat the same thing on the left side. The central lock is still unused for the moment.
5. Considering now what was originally the first strand as the third, take the third strand on the right side and bring it to the central one (the unused strand). Then weave it under the third lock of the left side.
6. Bring the first lock of the right side onto the second. Then bring it below the central one.
7. Repeat on the left side. Bring the first lock of the right side on the second and under the central one.
8. Stop everything with an elastic band. Then add a hair clip or a bow.
Crown braids
1. Apply the gel or another type of hair treatment. Use what you normally prefer to style your curly hair.
2. Take the top of the hair and tie it up. Leave the back of your hair-free.
3. Pull a small section of hair out of your head at the side of your head. So comb it and then work on it.
4. Divide the newly combed lock into three parts. Braid the hair tightly, first with the right lock on the middle one, then the left one in the center, and so on; then add more hair as you braid down.
5. Continue braiding until you reach the top back of your head. Stop and leave your hair as it is.
6. Get a new section of hair about 25mm next to the newly made braid. Now you will have to work all over the top of the head to create the remaining braids, going from one side to the other. So, repeat the type of weave, as indicated in the steps listed above. Finish the weave the moment you get to the top back of your head.
7. Again, take a new part and isolate the section of hair next to the previous one. Divide it into two strands and weave as you did for the previous strands. Continue until you have reached the other side of your face. So, you should get roughly a total of 5 or 6 braids at the top of the head that extends to the back.
8. Try to shape the final part of the braids to confuse it with the rest of your curly hair. The more voluminous your curly hair is on the shoulders, the more successful this look will be.
9. Add a romantic headband to complete the look. This creates a bottom line between the braids and loose curly hair. It also serves to hold the braids in place.
High 70s braid
1. Wash your hair. Comb them well to remove any knots.
2. Divide your hair into two parts by doing the middle parting.
3. Make two simple braids on both sides, grabbing all the back hair. However, remember to leave some strands free in front of your face to frame it better. Of course, do not braid the bangs too.
4. Stop the ends of both braids.
5. Bring both braids on your head. Take one on one side first and fix it high on your head. Then bring the other braid and make it meet with the previous one in the center of the head. Finally, fix them both.
6. Brush the side locks you left loose to make them smoother. This look must appear romantic but casual.


